
Ceramic paper clay blower stove
About the experimental making of a blower stove from ceramic paper clay instead of metal.
Most of my previous blower stoves have been made of sheet metal or foil (steel, stainless steel or titanium). These have been very serviceable for ultralight backpacking cooking. The experimental alternative will be made as a ceramic stove from paper clay. It will not be light, but it may have functional and aesthetic benefits for use in domestic power outages or car-based outdoor activities or base camping. If successful and simple to make, they could be carried to a popular campsite to be stashed for the next visit.
I have previously posted on DIY refractory from soil and sodium silicate and then on refractory from paper and clay. The latter is very much easier to handle, shape, mold, dry and fire than the former. It also avoids the handling of the rather alkaline silicate that is not so nice for our skin.
After finding out about the paper clay ceramic, I made a small test puck that was easy to make and it survived plunging into water when red hot, as all good refractories should. At that time I was limited by Covid 19 to small expensive packets of suitable clay and all my local ‘found clays’ were inadequate, so larger projects were put on hold. “I, at last, have a good supply of clay and can procrastinate no more”
My ultimate goal is to build a rocket mass heater style burner from paper clay, but I thought the blower stove would be much simpler and would provide valuable lessons for the more complex project that I will post on in the future. “Small stuff-ups make better lessons than big ones as one can have more of them.”
It brings together three of my passions; paper clay refractory, blower stoves and of course playing with fire. “Another born in fire to survive in fire project!” So here is the start of the paper clay ceramic blower stove experiment. It will be slow as I learn to be more patient and a protracted fishing trip might disrupt the project a little. Covid 19 vaccination has provided partial freedom!”
Why use paper?
For those who are new to the idea of refractory paper clay, it should not be confused with the play material paperclay with the same name and no clay in the mix.
It may seem strange to be making a device to contain a fire out of paper. However, the inclusion of paper makes the forming process easier, quicker, economical and more versatile. Then during the high-temperature birth in fire, the paper is just burnt away. The miracle of this transformation is that it leaves behind a magically improved skeleton of ceramic that is lighter, more insulating, crack-free and less prone to cracking due to thermal cycling or thermal shock than the parent clay when fired as pure clay.
It also allows the creator to easily add on to the creation at any stage in a way that would not work with normal ceramics. Put crudely, it is an excellent refractory for beginners or mug potters like me. As I later discovered it is in fact a modern form of Baldosa (e.g. animal shit and clay, ideal for people who don’t know the difference) that has been made for thousands of years in many primitive settings around the world. Again it is another case of nothing being really new.
Me
The paper clay blower stove
The paper clay mix
In my first test puck, I used equal parts by weight of stiff moist clay combined with wrung-out damp paper pulp and extra water to facilitate easy mixing. The refractory was a success, but I felt that for the blower stove a higher proportion of clay would be better and would give a harder surface to give many years of service. My new clay source was a little softer (ready for the potting wheel) and my paper pulp was by now totally dry and surprisingly tough to pull apart without the use of tools.
I settled on 1,000g of soft potting clay and 100g of dry paper pulp made from newspaper, (as the Aussie covid 19 stash of surplus dunny paper had all been used up). I mixed this up with a potato masher with about 1500g of extra water and left it overnight to soak and soften and mixed it more times in the morning until only small paper lumps were visible.
Plaper clay slabbing
Having mixed the paper clay as a sloppy mix, it needs to be dried out to make it workable. To do this quickly, I spread the sloppy mix in a layer that was about 15mm thick onto a large slab of plaster. This draws out the water within 3-4h to achieve a workable texture that is similar to modelling clay.

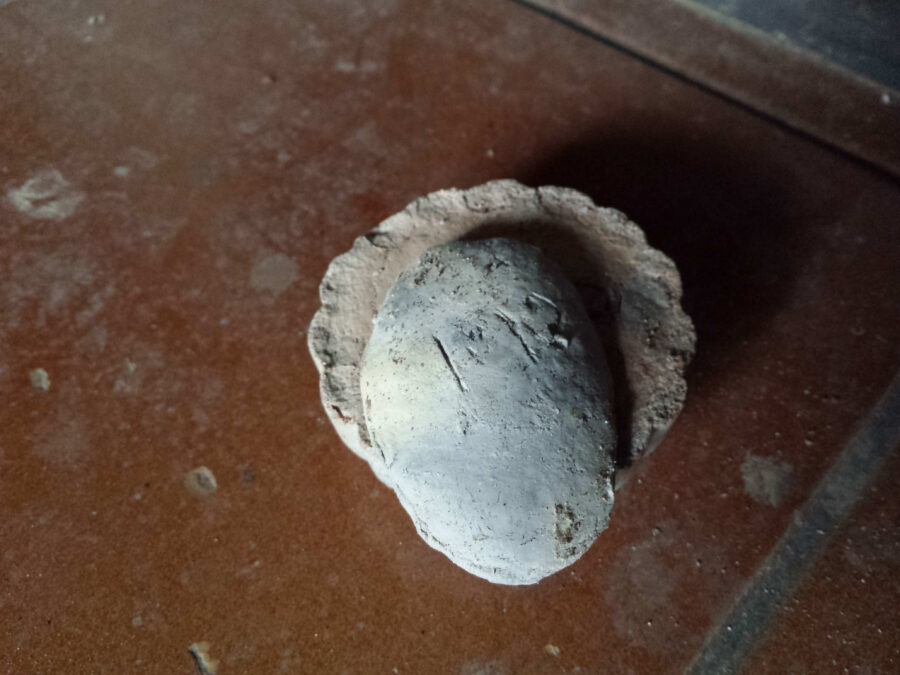
As I always tell my readers it is always wise to make a test puck of your secret bespoke refractory mix before committing to the big project and making a puck up of it. So here is my puck that was made by pressing some mix into a dessert spoon mold. I inscribed 1:10 to indicate the paper to clay weight ratio before firing. “Memory is a fragile thing in an active mind.”

The puck survived its hot birth and had the desired extra surface hardness that I wanted and correspondingly it had a higher-pitched sound when tapped.

Removing paper clay stove from the slab
The paper clay is quite easy to remove from the slab by lifting it from the edges with a long blade spatula. I cut the sheet into useable strips or circles according to the shape of the item that I am making. Any scraps can still be used.

Molding the fire bowl
I used a plastic flower pot (??mm dia) to make a mold. The top portion of the pot was cut off at a height of 90mm from the bottom. I used the top portion as an insert to line the shortened pot. The extra layer covered the drain holes around the bottom of the pot wall and made the mold stiffer. I expect it will make it easier to slip the liner out when it comes time to remove the partly dried blower stove fire bowl. This will allow for more rapid air-drying with all surfaces exposed.

Paper clay storage
Spare paper clay sheet can be stored damp for another project, but it goes smelly in this state. Consequently, it can be air-dried and stored without the smelly problem. It is ready to be quickly wetted up for the next project.
Stripping the mold of
The paper clay had dried to a firm damp texture (~3days in the sunshine, under a plastic solar drier cover). This allowed me to slip the bowl, within the liner, out from the outer mold. Then I could easily peel off the liner and allow the clay bowl to quickly air dry under the solar dryer once more.

Full drying
Air drying before firing is usually something that I, unfortunately, can get impatient about and it is not easy to judge by feeling from the outside of the molding. This time I weighed the bowl on consecutive days to find when the weight was not reducing. “I knew I was in luck when it weighed 866g two days in a row.”

Hole cutting
To make the molded bowl into a blower stove I needed to make a 20mm dia hole as a port for the fire blower and also to make an 80*60 mm rectangular opening for the fuel stick port. This was my first effort at a serious cutting of paper clay, so I was unsure about whether to do it before or after firing. So I did it before firing.
I used a masonry drill bit and a slim disk in an angle grinder. These cut through easily and were somewhat of an over-kill. I found that a hack-saw blade cut the material easily and could be used to cut where the slim disk could not go. A coarse file was used to enlarge the blower port to a suitable diameter. The cutting left fibrous or woolly finish to the edges and this could be carefully removed with gentle filing with a coarse file or sandpaper.
Next project I will try the hole making after the firing as I expect that the cutting will be just as easy, but somewhat cleaner and sharper.


The paper clay blower stove performance
I was a bit ambitious and applied a glaze that did not work so well, but I will save that story for later. With nothing left to lose, I set up the stove and started the fire in it and made a cuppa to celebrate my partial success.


Paper clay confession “shhhh”
I was delighted with the easy working properties of the paper clay ceramic and I concluded that it was a great success. However, I was a bit adventurous when I applied a sodium silicate glaze to the beautiful bespoke fire bowl.
I applied the glaze to a small test puck of the fired paper clay and it left a nice crisp and dense dust-free finish on it. “I preach such testing to others.”
However, when I applied a liberal coating of the glaze to my beautiful first paper clay blower stove it possibly soaked in a little too much and caused the bowl to develop cracks. It survived firing and worked well, but looks unsightly. I will have to investigate what went wrong with the glazing, but I have prepared another bowl to hopefully learn from my mistakes.

Improvements for blower stove Mk2
The paper pulp in the first stove was a little grainy with 100g dry paper plus 1,000g wet clay. I thought that possibly a higher proportion of clay might improve the mix. For the next redemptive bowl, I have used a mix containing 100g paper pulp and 1,300g of soft clay. I also gave it a whirl in my food processor. It made the mixture very smooth and should make a superior refractory.
I also oiled the plastic mold surfaces with a little olive oil so that the clay may more easily conform to the mold surface and hopefully make the mold liner release more cleanly to leave a smoother surface for easier glazing.
Discussion
The paper clay ceramic blower stove has several advantages over ones made from sheet metal.
- Its extra weight makes it more stable when pushing fuel sticks in through the fuel port.
- Less heat is lost through the walls of the stove and it does not singe the ground.
- The stove body stores heat so that it holds an idle burn better and is easier to ‘re-start’.
- This success of my first test project bode well for the use of paper clay ceramics in more complex DIY projects that involve playing with fire.
I made another two stoves and blended the paper till it had a smooth texture thinking that this might make the refractory less likely to crack when firing. Unfortunately, this strategy did not work and they both cracked during the initial. firing. The last one survived and I use it for cooking (cracks and all) during a recent protracted power outage. It was a delight to cook on. There also is no connecting bridge across the fuel port and I think this improves the flow of the flame against the bottom of the cooking pot.


“I just need to crack the magic paper clay formula instead of cracking the stoves!”
Tim
Addendum
I tried all sorts of tricks to improve the stability of the paper clay stove. Some improved the short term stability, but none survived the test of repeated thermal cycles.

This means that I will give up paper clay for this purpose and go back to silicate/soil formulations.
Excellent topic. I have similar ideas with paper and clay mixture.
I have a very good pottery book, that solely focuses on Paper clay and there advise and testing recommends not to ad grog to paper clay as this gives a crumbly texture to a fired.
Anway, excellent work an will keep you posted about any testing I carry out.
I would love to build a rocket stove pizza oven, with the main components being out of paper clay. Hopefully this summer ’23
Hi Duncan, Thanks for your comments. It is nice hearing that someone else shares my interest in this potential refractory. I anticipate that the problem with a rocket/pizza oven, of such size, will be the issue of getting the material up to the clay vitrification temperature (1,000+C) to make the item stable in the long term. Please keep me posted about your projects. Tim
Hi Tim, Did you go to the other extreme of %50/%50 maybe with some grog in there for good measure.?
Hi Mathew, Thanks for your interesting and timely questions. I did not try the 50/50 option as I was aiming for good insulation to make it very different to the metal fire bowls. I think I should revisit paper clay with a higher clay proportion as it still may be a good enough insulator. I hope this makes sense? I think it will need a higher firing temperature (see my comments below).
Regarding grog, I certainly tried that and it did not improve things, but I now think that my fundamental problem with my paper clay is that I did not get the big items hot enough for long enough.
I am writing another post on making big DIY molded insulating refractory tiles that can be used to form a furnace or stove (Ironically for those higher temperatures). In my discussion of the possible refractory material to use, I consider my paper clay again. It should be good as it is equivalent to Baldosa tiles that have been used as refractory materials forever. In the discussion, I raise the issue that my very small (spoon-shaped) sample of the paper clay (photo below). It was successfully fired to a clinky hard finish (like china) that rings when struck. It is very different to the fired blower stove bowls that have a dull thud sound when made from the same recipe.
My thoughts are that my paper clay ‘failure’ may simply be that I have not got the clay hot enough for long enough to get a satisfactory melt and the required fusion of the clay for good strength. The post is not quite ready to release, but I would appreciate hearing your ideas. Tim