
Tie out tabs for ultralight pyramid tents
DIY tie out tabs that are sewn from tent fabric are described for ultralight backpacking tents as tie out and peg out points.
A simple method that has now only once been reported in the known universe of tinkering, but it has worked without fail, in wind, rain, storms, ice and snow for over 40 years. Making your own backpacking gear and living under a rock in ignorance of the ‘proper’ or conventional way of doing things is a blessing for true innovation.
MothyThe Elder
Background to my tie out tabs
Ever since the first introduction of lightweight synthetic fabrics for tent-making tinkering, I went off the rails and stubbornly refused to use conventional over-engineered, webbing, and clunky tie-out devices on my tents. They added cost, weight, hardness, catch points and bulk to my slick and compact stuffable tent canopies. “On a fine ultralight tent, why have a guy out webbing that has the strength to tow a car?”
[Add a video of towing a trailer with an ultralight tent tab]
Many tents have a minimum number of tie out tabs and peg outs tabs and extra ones often have to be added later to have the tent perform its best in strong wind, cold weather and blowing snow. I figure that it is best to put plenty of tabs on the tent in the first place. The same applies to snow/bug skirts and their peg points.
I also make my tents so that they can be pitched low for storm survival while being able to pitch high for comfort when conditions usually permit or wide when using an excavated snow pit. This means that my square pyramid tent requires eight or more extra tabs for each configuration. If the tabs are insignificantly small, cheap and easy to attach, it makes such a versatile pyramid tent practical to make.
Forming bulk tie out tabs ribbons
I use long strips of off-cuts of the tent’s fabric (~ four times the width of my lay flat seam width, normally ~8mm). I carefully fold the stip in on itself (four layers) to hide the raw edges and sewed it together as a very long strip or ribbon with a simple line of uninterrupted stitches. “It is a good job to do when your brain is a bit dull.” These strips can later be cross-cut into suitable lengths to form a variety of tie-out tabs.

Forming the tabs from the tie out ribbon
I find that it is easier to fully form the tabs by sewing or glueing them together before sewing or glueing them to the tent.

Attaching tie out tabs before sewing to the tent seam
It is easier to sew the tab onto (or into, as described later) the tent seam if it is first glued exactly into its correct location.


Furthermore, if possible this sewing is best done just after forming a new seam (when surface mounting) or when sewing the seam (when embedding the tab in the seam as described later). This means that the stitching is easier as very little of the large and growing tent canopy needs to be passed under the bridge of the sewing machine and there is a much lower risk of making ‘oversewing’ sewing mistakes.
Attaching tie out and peg out tabs to the tent
My preference has always been, where possible, to attach the tie-outs to the tent seams. Having more smaller tent panels, rather than fewer larger ones helps with this design aspect and overall tent strength and shape. The seams are the strongest part of the tent canopy, and they spread the holding forces naturally over a vast area of the tent without any need for backing or reinforcing patches. Also, having multiple guy out tabs on a seam spreads the load even more and will make a tent more stable and have more usable space inside.
Sewing the tab onto the lay flat seam requires stitches to pass though eight layers of tab fabric (four in the tab and four in the seam). With most thin tent fabric the stitching is easy, but a little candle wax on the surface of the tabs will ensure that the sewing is easy.
Having multiple tabs will also enable the one pyramid tent to have multiple configurations for pitching :
- Low in storms,
- High in better weather and protection of tree or,
- Wide over an excavated snow pit when camping on deep snow.
If tent panels are so big as to need mid-panel guy-outs (off seams), conventional reinforcing patches can be used, but I consider that long faux ribs of fabric with that same structure of the tabs can be glued and/or sewn inside the canopy for such attachment [subject of another post].
In my experience, when tabs are attached to lay flat seams in this way the stitches never leak rainwater through. ” I have recently, rain-tested a DIY polyester tent with and without stitch/seam sealing and it did not leak in either case.” However, Stitch sealing with silicone rubber is easy and will protect a composite cotton/polyester thread from slow water wicking and possible rotting.
A digression. What tent seam works best for tab attachment?
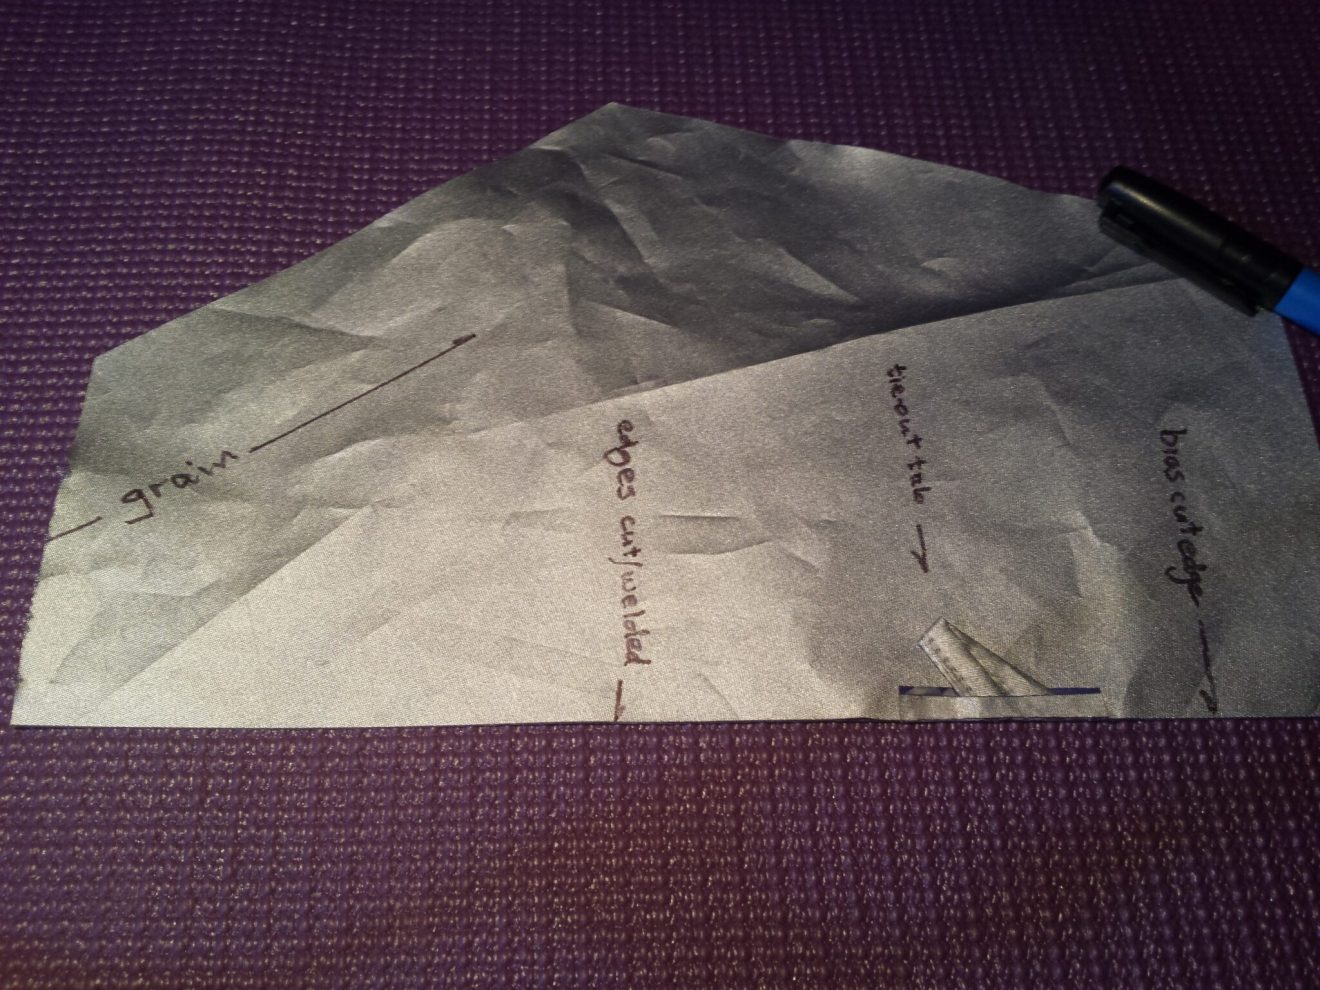
Note: If you know all there is to know about lay flat seam sewing please skip below to the heading ‘Back to boring tie out tabs’. Otherwise, this is just about my unusual take on easy lay flat seam forming and a strong and simple finish at the tent apex. It also facilitates the easy embedding of the tabs within the folds of the seam. Finally, the lay flat seams that I describe combine a straight and bias cut edge in each folded seam. I use these mixed grain seams to provide better limitation of seam stretch. However, the method should be suitable for other grain combinations.
There is much discussion about what is the best waterproof and strong seam for DIY backpacking tents. From my experience, a lay-flat tent seam, although a little tedious, is the best and for me, they have never mechanically failed or leaked (even when experimentally tested on a tent made from unwaterproofed polyester fabric, prior to precautionary seam/stitch sealing with diluted RTV silicone rubber.
Note: Lay flat is not the correct name for a seam that gets all sorts of names, but in my hands, it becomes the seam described by ISO 4916 2.04.06. despite my unconventional way of setting up the seam, as described next.
Further seam sins and digressions
I felt that further discussion of my naughty seams would be worthwhile as they are integral to my best way of attaching tent tabs.
“The seam was taught to me by my dear Mum who was a most magical sewing machine operator (ex-professional) who fixed ‘dead’ sewing machines around the world wherever she was a guest. For our kid’s projects, she would sew almost anything for us, but drew the line at sewing plywood!”
My seam preparation at first may seem a little odd or tedious. However, it makes the formation easy and eliminates problems of bias grain stretching. Eventually, the operation becomes a relaxed and systematic one with almost no room for mistakes. It allows me to calmly concentrate on correctly adding two or three or more tent panels per evening after the real daylight-hours work is over.
“The process also allows me to fold, stack and clip together the already sewn tent panels in a neat bundle so that they stay that way, beside the sewing machine, until the tent canopy is completed. Only the last panel that has been added and the next panel to be added need to be involved in each panel addition as they pass under the sewing machine bridge or arm.”
Bias grain edges wrapped in straight grain edges. This process starts by placing the first tent panel (or an already joined panel) with the/their outside fabric surface facing downward and the only available straight grain edge laying flat and ready to form the next seam.
The next panel to be added is put on top with the outside surface facing upwards and its bias grain edge roughly aligned with the straight edge below.
Then I wrap the straight grain edge around the bias grain edges in preparation for sewing the first line of stitches for the lay-flat seam. This unusual method makes the sewing of the bias cut fabric edge easy. When fully sewn it will limit the stretch of all seams and makes every seam equally unstretched. It appears to make the dreaded catenary cut or seam redundant!
Pinless seam preparation and sewing. Continuing with disrespect for conventions and even my mother’s teaching, I now use no pins in this operation, instead, I temporarily clamp the infant seam together to make sure that all datum lines are correctly aligned and puckering of the bias edge is eliminated or ‘eased’. Then I tack glue the fabric together with acetic cure RTV silicone rubber at about 30cm intervals and re-clamp it while the glue quickly cures. This is done one glue tack at a time as the thinly spread silicone glue cures very quickly.
For a single seam, by the time the glue tacking and clamping is finished the sewing can start at the ‘most cured’ end of the seam. The clamps can be simply slipped off before that section of the seam is fed through the sewing machine. The stitching action is unimpeded by the silicone rubber. The details of this unconventional sequence are described in an experimental breathing polyester tent. The photos below may help to explain all my gobbledygook.

“This preparation for the Mok Felled Seam, that I learned from my Mum, is unusual, but very efficient when compared with the conventional method. I start by wrapping the stretchy bias grain edge within the stable fold of the straight grain fabric. It means that the sewing machine foot and the ‘feed dogs’ only contact the straight grain during the first difficult line of stitching. No pins to remove or ‘catch’. Just keep sewing through the silicone rubber tacking. It is just great for a crap sewer like me and I no longer dread these long seams, Now my biggest worry is just hoping that the bobbin does not run out of thread and spoil the perfection!”
With growing confidence in the new method, I progressed from using clothing pegs to custom-made low-profile bent metal clamps. These made it easy to carry the growing tent canopy from the assembly area (with clamps attached) to the sewing machine, while the glue may be very sticky, but not quite fully cured on the most recent glue tacks.


Add each extra tent panel bias grain edges to the only straight grain edge on the growing tent. This systematic approach to sewing each additional panel make the process simple. There will be only one straight grain edge to connect the new panel to (by its bias grain edge). “It is hard to go wrong.”
It means that all the growing tent canopy can be left neatly folded as a compact bundle that can be held together with a couple of hobby clamps as it grows. “I put a temporary light plywood extension on my sewing table on my left side to support the folded tent as it grows.”
The folded tent never needs to be passed under the sewing machine bridge. Even for the second row of stitches, only the newly added panel must pass under the bridge. “This greatly reduces or eliminates those pesky over-sew blunders and those tell-tail lines of needle holes in your work of art. Out of interest, I tested the only (and tiny) set of blunder holes in my first polyester tent and they did not leak (without any sealing) as shown in the video below.
All my tents have walk-in zippers that run from the load-bearing apex hem to the ground and preferably through the snow/bug skirt. This makes the sewing easy and a simple shape for fast tent drying.

My first seam will start on a doorway panel. The bias grain edge will eventually be attached to one side of the zipper and the straight grain side will be ready to wrap around the ‘bias grain edge’ of the next panel to be added. Systematic addition of panels this way means that the last panel will finish with the straight grain ready for attachment of the other side of the zipper. “Pull-apart zippers work best in this situation”
Terminating lay flat seams at the pyramid apex.
I thought that my digression would not be complete if I did not mention the tricky business of neatly finishing all those lay flat seams at the tent apex. This post on BPL has a photo of what I think is a strong but ugly apex finish, just like I used to do.

Now my simple solution to this challenge is to stop the seam stitching about 10cm short of the top of the panels. When the canopy is complete I sew on a simple double thickness loadbearing hem with a drawcord. It is sewn onto the inside and outside of the tent with many rows of stitches while the tent is opened up and pulled straight. Eventually all the fibres in four layers of fabric over a hem length of about 20cm support the apex load.


It is very strong, makes the sewing easy, looks good from both the outside and inside of the tent. It allows a protruding pole such as a bush pole to be used. It can also be suspended from outside poles or an overhanging branch if required. ‘This is indeed strong enough to tow a car.”

Back to boring tie out tabs
Seam-integrated tie-out tabs. More recently since getting my tent designs more organized through spreadsheet design models (and hot fabric cutting and glueing), I now contemplate an even neater attachment method.
A sloping ‘V’-shaped tab can be formed by glueing it into a simple folded web of fabric. Then it can be glued into the first fold of the lay flat seam. This attachment method is done while making the seam and avoids the tedious job of sewing the tabs onto the fully sewn canopy.


The web with the attached tab can be inserted and glued onto the lay-flat seam while it is being prepared for sewing the first line of stitches (as described above).

Quickly after applying the glue the seam can be rolled for the first time and clamped to allow the glue to cure.


The thin film of glue cures very quickly. It means that by the time I have finished the glue tacking and clamping of a seam, the starting end of the seam is ready for sewing. The oversewing of the first line of lay flat seam stitches is very easy and the silicone rubber glue does not adversely affect the sewing.

Now the seam can be rolled flat ready for the last line of stitches. When the web and V-tab are reached, multiple rows of stitches can be made over the V-tab and its web, before continuing on with the finishing of the second line of seam stitches. “The tabs will be formed seamlessly as the seam is formed and should spread the load over a large area of the seam”.

Tie out tab protectors. To protect tie out tabs from wear when they are pegged directly to the ground, I use a simple tied loop of cord. It can easily be replaced if broken or worn out and can be large enough to accommodate the biggest sticks when they are used as tent pegs or snow anchors.
How many tie out tabs are too many?
When tie outs are so minimal and easy to attach, plenty of tie-outs are best. If they never are needed so be it. However, I like my tents to be versatile so that they can pitch:
- To provide instant shelter as a bothy,
- To pull out as a massive sun shade or for rapid drying,
- To set up quickly with four pegs for unpacking and packing up in falling rain and snow,
- Over an excavated snow pit to maximize accommodation and house a central wood burning stove/heater,
- Low down for storm survival,
- High in trees and rocks with bell walls as a winter palace where a big footprint may not be welcome,
- As a rainwater catcher,
- As two survival shelters when cut in half in an emergency if a group must split up.
Consequently, if many cheap and simple tie-out tabs are added when making the tent, it makes all these options possible without noticeably increasing weight, cluttering the tent or spoiling its smooth soft packing or waterproofness or good looks.
Simple double tie outs. Multiple guy outs on a single seam necessitate a multiplication of guy cords, tension adjustors and tent pegs. I found this resulted in terrible cord tangles if they were conveniently left in place when packing and unpacking the tent. Even worse if hung out in a breeze to dry the tangle multiples many times. Alternatively attaching and detaching and rolling up the cords to avoid the tangles was tedious.”
I found that the cord adjusters and the tangles could be eliminated by having fixed in-place cords that spanned two tie out points and used only one peg as the ground anchor.
Such guy out cords can have a light shock cord in the line as an adjustor of wet/dry tension with silnylon pyramid tents. No such adjustor seems to be needed for a polyester pyramid that has virtually no wet/dry stretch.

Tie out tabs, a contingency for retrofitting, stuff-ups and changing your mind. If all the planning turns to shit or more unexpected tabs are needed then the external attachment will always suffice. “Only the Snow Gods will notice the defect if they spend time on the trek with you.”
Tent peg tab protection loops. While I claim that I have not had a tab failure in 40 years, I have (or my camping companions have) destroyed a tab or two where they can be rubbed through when knocking in stubborn tent pegs that have been contaminated with damp soil and sand etc. It acts as an abrasive saw.
My solution to this problem was to make a small sacrificial loop of brightly coloured nylon cord (Bricklayers line,….. laying eggs would be hard enough but imagine laying a brick!) that is permanently tied through the loop of the tab (shown in some of the above photos).
This protects the tab completely and the loop is much easier to handle in freezing weather with cold hands. “Happily, just like taking an umbrella on a walk, contingency for field replacement nearly always means that failure never happens.”
Tie out tab protector loops for use with bush stick pegs. The above cord loops, if made big enough, also make it easy to use bush sticks as tent pegs. If available, they get a wonderful hold in most snow when small metal pegs will not hold well. Stick pegs also work well with such loops with terrestrial camping on soil, sand and gravel. A single high tensile concrete nail can easily make a pilot hole, for sticks, in the hard ground that is often encountered at trailheads on through hikes. “Simply kicking the sticks off at ground or snow level is a great pleasure when packing up in a hurry on cold mornings.”

Tie out tabs and loops as connectors for use of snow anchors when camping in snow above the treeline. Such loops can also be used for quick connection (toggle action), to buried snow anchors with adjustable cord locks. These are good to use with cold hands, without the need to use any knots. “A good stomping with ski boots will usually easily release the frozen anchor in the morning.


[Add a photo of the cord lock toggled in a small nylon loop.]
OTHER POST FOR PYRAMID TENT FANS
DIY breathing polyester tent for backpacking- Beat the dreaded condensation problem
Pyramid tent design- A spreadsheet model
Polyester ageing- About as interesting as paint drying
DIY silicone seam sealer- Getting a long pot-life
A pyramid tent vestibule- Turn a pyramid into a winter palace, using a spreadsheet model
Tie out tabs for pyramid tents- Keeping DIY tabs cheap, small, simple, strong and light
Addendum
If embedding tie out tabs are of interest, you may like to see my subsequent post; Hot knife cutting and welding. I describe a hot cutting/welding preparation of tent seams with embedded tie out tabs. It is another easy alternative seam preparation to the glueing process.
Tim