
DIY calcium phosphate refractory
DIY calcium phosphate from calcium hydrogen phosphate and lime. Can it make a DIY calcium phosphate refractory that is castable?
Preamble
Part 1 is a keystone post about DIY calcium phosphate refractory that can be made by the in situe reaction of calcium dihydrogen phosphate and calcium hydroxide (builders lime), within the forming mold, in the presence of excess water.
Also, Part 1 primarily explores the alternative use of these chemicals to make a castable DIY calcium phosphate refractory that is conveniently and separately mixed in a bowl with water before being cast into the mold.
In Part 1, only three small test pucks were made, but they provide exciting prima facie evidence that calcium phosphate can indeed be made as a cheap, simple and convenient castable DIY calcium phosphate refractory This was done with and without the addition of 50% perlite thermal insulation granules in the aggregates.
Notes: Castable refractory definitions:
- 1. A refractory aggregate that will develop structural strength by hydraulic set after having been tempered with water and compacted.
- 2. A mixture of a heat-resistant aggregate and a heat-resistant hydraulic cement; for use, it is mixed with water and rammed or poured into place.
“I think my use of the term ‘castable refractory’ best matches the first definition above. As I understand it, the calcium hydrogen phosphate and calcium hydroxide react together in water to create ‘heat-resistant hydraulic cement’ during the mixing and curing process. Also, for Pucks 1 & 2 there is no aggregate added. So I hope the zealots are not upset.”
Mothy The Elder
Part 1 also has a rather lengthy and rambling introduction about other non-castable DIY refractories. However, it provides an important context for the castable DIY calcium phosphate refractory (and the subsequent postings).
The introduction attempts to explain the problems/limitations of non-castable refractories when making large (monolithic) DIY refractory items such as stoves, forges and furnaces in the hands of DIY tinkerers. “Without knowing about all those problems, this castable would not look so wonderful!” Lastly, this simple castable should add another simple castable refractory material to the DIY fire-loving tinkerers toolkit.
Parts 2 to X will be added to describe such things as; Insights into the refractory reaction, compatible DIY refractory surface coatings, optimised component ratios, alternative refractory insulation particles & extenders, lamination with other refractory materials, long-term refractory survival after repeated heat cycling………………………. and the list goes on.

Here is a list of the proposed parts of the post:
Part 1 DIY Calcium phosphate refractory Part 2. Calcium phosphate refractory reaction, curing and firing insights Part 3. A tough DIY coating for DIY calcium phosphate refractory Part 4. Calcium phosphate refractory with fine perlite insulation Part 5.- Calcium phosphate refractory with combustible wholemeal flour insulation Part 6. Calcium phosphate refractory with combustible paper insulation Part 7. Calcium phosphate refractory with vermiculite insulation Part 8. Calcium phosphate refractory machining and cutting
Introduction to my tinkering with DIY calcium phosphate refractory
I have always been fascinated with the abundant materials that can be mixed with common chemicals to make DIY refractories in our backyards, sheds or kitchens.
The magical reactions with many minerals or even soils can convert the matrix into a DIY refractory that can just laugh at the hottest fire that mere mortals like us can create with forced air and fuels such as wood, charcoal, gas and oil. Several of these refractory mixes are described in my posts:
DIY refractories from sodium silicate- “Born in fire to survive in fire”
DIY sodium silicate refractory- “Getting the preparation right”
DIY refractory from soil paper and sodium silicate- “Dirt cheap & born in fire to survive in fire”
DIY refractory paper clay- “for people who play with fire”
Meticulous preparation of silicate refractories. Making stable silicate refractories from a ‘cheap’ or ‘found’ mineral substance such as loam soil is possible. However, the process must be meticulously executed by mixing with the sodium silicate solution that has an excess of sodium hydroxide in it. This makes it a pretty corrosive caustic chemical to handle.
This must be followed by steady slow compacting into a strong forming mold. After stripping from the mold the bespoke item needs to be gradually cured through a multiple-stage low-temperature curing process (up to ~110C). During these stages, sufficient carbon dioxide must absorb from the air to neutralize the excess sodium hydroxide. At the same time, all of the free moisture must be expelled.
To continue the cure, tightly chemically bound, water must next be gently expelled. Eventually, to achieve full stability and refractory properties it needs to be heated thoroughly during successive heating steps from 110 to ~250C. “The above processes become increasingly difficult as the size and thickness of the refractory item increases and thermal insulation particles are included in the matrix.”
All these careful steps help to avoid the pitfalls of steam bubble formation, swelling or puffing and cracking. Once a temperature of about 250C has been reached throughout the innermost parts of the item (without disaster) the refractory will just laugh at fire and flames up to 1000C and beyond. “I have not found the limit.” It looks and feels like a fire-resistant hard rock that you can sharpen a knife on.


- Note. When pure refractory materials such as aluminium oxide, and garnet are used as the refractory matrix for the silicate refractory the process can be much simpler, but they are much rarer and more expensive to use in large quantities for monolithic refractory items. “On the other hand soil is dirt-cheap.”

Clay-based refractory. An alternative refractory can be made from clay and waste paper. It can be quite cheap and very lightweight. In contrast with the silicate refractory, DIY refractory paper clay is non-corrosive and very easy to prepare for firing without a need for molding or compression. However, with the test of time, I found this promising refractory eventually fell apart with repeated high-temperature use. “I think this failure could have been due to my inability to get large refractory objects up to the full clay fusion temperature within the core of the refractory.”
This high temperature must be maintained for a prolonged period so that the refractory material slowly becomes fused or glassed or vitrified throughout in order to survive in applications such as wood, charcoal, oil and gas-fired stoves, forges, furnaces and foundries.
So if you have access to a high-temperature furnace they may be a good option for you. I think the issues are strangely circuitous. “We need to make a good DIY refractory to be able to make a good DIY refractory kiln to fire itself in. Or you have a good kiln so why would you need to make one out of DIY refractory?”

I have achieved such thorough heating, only with difficulty, for small paper clay test pieces (shown below) and even then, one teeters on the brink between fusion and meltdown.

My next improved and enlarged Nebuchadnezzar furnace (with forced air) could fire larger pieces hotter and more thoroughly, to start to vitrify or glaze parts of the surface. But it could not effectively fire large items thoroughly and evenly.

In the bigger charcoal furnace a small and thin a clay-based refractory item can even be melted to the point of slumping.

If all this difficulty with heating requirements was not bad enough, we backyard tinkerers usually wish to add lots of refractory insulation particles to our fire-containing refractory mixes. These can be materials such as vermiculite, perlite, volcanic glass, and even charcoal or organic particles such as paper (that eventually burn away, leaving air voids as the insulation). This insulation greatly retards the effective heating of the inner core of the DIY refractory so that it does not reach the required fusion temperature.
Consequently, a cheap and abundant refractory that is ‘fire-ready’ straight from the mold after appropriate drying would be very welcome for tinkerers like me.
DIY refractory that is fire ready straight from the mold
Lime and sodium silicate refractory. I found a lime and sodium silicate refractory recipe on a Youtube post. Importantly, it did not require any high-temperature firing to be ready for high-temperature service. Well, I tried this several ways and despite a fascinatingly fast reaction, the material fell apart very soon.

I could not get a refractory that was stable from this mix. Maybe I had the wrong type of lime or silicate? Anyway, my test pucks just fell apart before they could be put to the test in the fire.
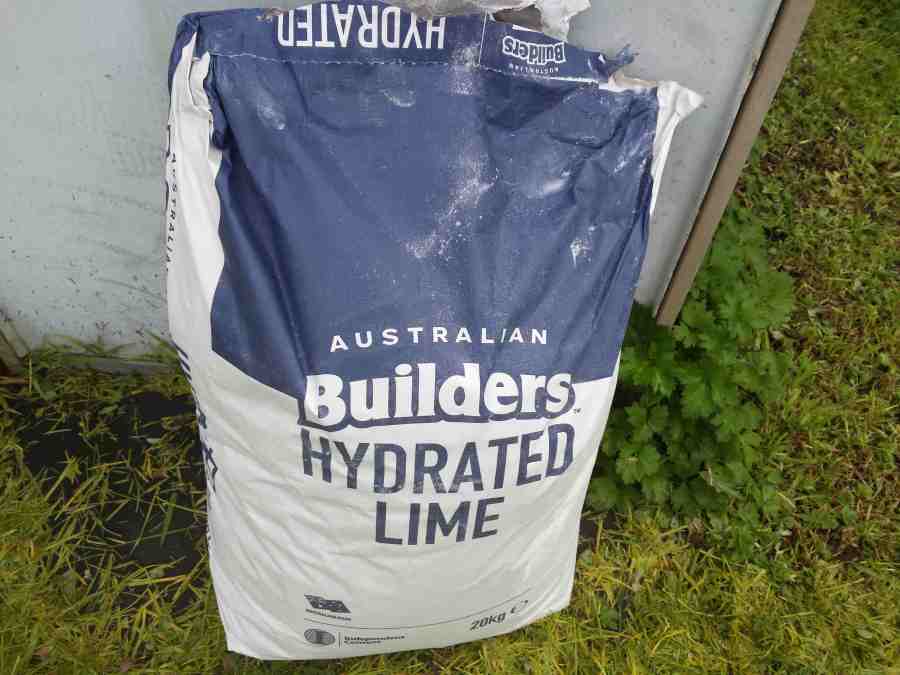
On the bright side, I had a huge bag of leftover Builders Lime and another from a Garage sale. “They were just begging for another noble refractory tinkering use.”
“I think that you could imagine my excitement, with a touch of scepticism, when I viewed another Youtube post about a refractory that could be made with common and cheap minerals/chemicals that obviated the need for firing and used…………you got it…………LIME.”
DIY Calcium phosphate refractory with no need to be fired. Thanks to ‘(Mis)Adventures in Materials’ for his Youtube post, How to Make Calcium Phosphate High Temperature Refractory. He provides calm, encouraging fulsome details about a furnace refractory brick (or tile) that was made by simply reacting calcium hydrogen phosphate (triple super phosphate– I think it would have been the dihydrated form Ca(H2 PO4)2.(H2O)2, at least mine is the dihydrate) and lime (calcium hydroxide, builders lime, Ca (OH)2 ). He used a 3.7:1 m/m ratio of the two respectively.
As an insulator, he also added an equal volume of perlite that had been ground from the original coarse granules into a fine powder.
The well-mixed dry chemicals and perlite were put into a simple wooden mold and placed under gentle compression with the weight of a brick. Then it was just flooded with water. The chemistry looked after itself overnight. “I thought that it might be worth a try……… almost too good to be true. It sounded quite simple and well……..I had heaps of lime left over from the last refractory failure!”
Part 1.-My try at DIY calcium phosphate refractory molding as a castable
The following is my positive account of my investigations into this very interesting and simple DIY calcium phosphate refractory. At this early stage, I have only made three small test pucks.

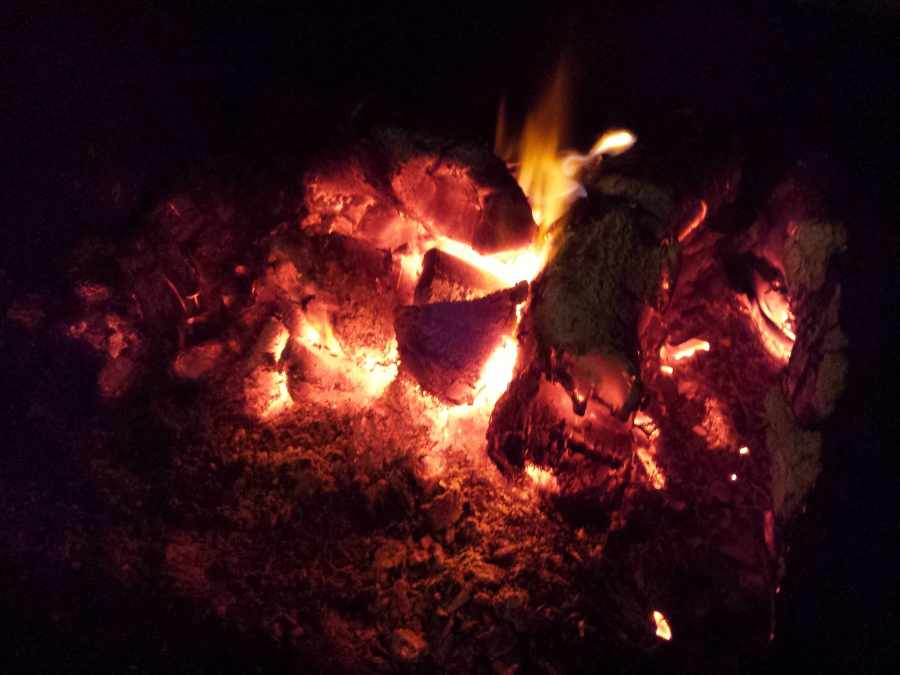
All my test pucks have survived their first Tolkiensque ‘challenge by fire’. They glowed the same incandescent colour as the glowing Blackwood charcoal that engulfed them and made them almost invisible.
Unfortunately, there was no profound inscription revealed by the heat that may tell me the meaning of life or the perfect recipe for a DIY refractory. But wait…………….maybe there is a hidden message in their survival in that inferno.
Mothy The Elder
However, at a practical level, I think I can confirm that ‘(Mis)Aventures in Materials’ has shared a recipe that may give him Wizard status. He may have enables us to make DIY refractories that are simple, cheap and versatile for us fire tinkerers even if the formulation is not quite as magical as Tolkien’s rings.
Part 1 is my account of the making and initial testing of this exciting refractory. My testing repeated the prior in situ molding technique with water flooding and compression. It also explores wet mixing prior to molding which morphs into a traditional castable refractory that appears to be equally good or even better.
- Note: Without the fear of rapid set up, I have made more test pucks with more radical formulations and the pre-mixing has been easy and relaxed.
I will leave refractory coatings, other additives & thermal insulators and larger casting to future addition to this post as time permits.
Differences between (Mis)Adventures method and mine
I thought it would be good to start by outlining the differences between our two methods.
Weight ratio. Right from the start, I had a hunch that the stoichiometric ratio was a ‘bit-off’. I made my own estimate of the component ratio as ~1.78 for the stoichiometric balancing of one mole of calcium dihydrogen phosphate dihydrate (the tetravalent acid) with two moles of calcium hydroxide (the divalent base) according to the following reaction:
Ca (H2PO4)2.(H2O)2+2(CaOH2)=(Ca)3.(PO4)2+(H2O)2
molecular weight (g/mole) No of moles stoichiometric wt. weight
Calcium dihydrogen phosphate 270 gram/mole 1 270
Calcium hydroxide (Lime) 76 gram/mole 2 152
WEIGHT RATIO 1.78
- Note 1: I contacted (Mis)Adventures and he agreed that my calculation was correct. He also suggested that the ratio may not be that critical. That would be very good if it is so! “Who knows, but I would have liked more lime in the mix as I have so much of it and the phosphate is somewhat harder to purchase in Australia!”
Fine calcium hydrogen phosphate. In the (Mis) Adventures video the calcium phosphate granules are shown to be quite coarse and of irregular sizes and they were subsequently ground finer. In contrast, my source of the phosphate is in the form of very fine, shiny and uniform prills that look as though they already have 30-50 times smaller diameters, so they were used as is.
Mixing bulk calcium hydrogen phosphate and lime. Given that I was going to do a series of tests, I decided to make a dry bulk mix of phosphate and lime at my ratio of 1.78 and mixed them together in my (poor) food processor. Then, I could simply take a small test portion (ie 50g) to make each of the various test pucks from it.
To grind or not to grind our perlite…..that is the question? (Mis)Adventures ground his perlite to a fine powder before mixing it in. He considered that this was needed to get a robust refractory brick. I also think this was a good idea. However, I find that the smallest trace of dust from perlite is obnoxious to my lungs even without grinding it (It is probably a bad silicosis risk). Dry grinding will only make it worse. So, I did my first refractory test using un-ground perlite granules with minimal contact with it while it was unwetted.
- Note: While considering safety issues, it is probably worth noting that long-term exposure to lime can cause lung damage, so take care.
To flood or mix the water in? (Mis)Adventure spread the refractory mix in a wooden mold that was sitting in a plastic bowl. Then it was covered with cloth and a wooden lid that was weighted down with a brick to provide compression. Then the mold was flooded with water and the reaction into calcium phosphate refractory was allowed to proceed overnight.
He indicated that he thought that this soaking and weighting was required to prevent flaking of the finished refractory. He also indicated that the reaction was relatively quick and there was not enough time to mix with water and then do the molding before the material started to ‘set up’ (I hope I understand and report correctly).
As my starting point, I made three test pucks; Puck, 1 without perlite using compression and flooding, Puck 2, without perlite and wet pre-mixing and without compression and Puck 3, which was as for Puck 2, but with the addition of unground perlite insulation granules. “What did I have to lose………. another three failed test pucks………. and more fill for the potholes on my farm track?”
DIY calcium phosphate refractory molding methodology
Molding of test pucks. My three preliminary test pucks were molded in tall plastic picnic tumblers as shown below (instead of porous and probably leaky wood molds). I used another tumbler to tamp down* the refractory mixture in the molds.
- *Note: I felt that using the tumbler for tamping failed to provide adequate consolidation in all parts of the puck and sometimes left small unfilled voids. So now I use a flat bottom tamper with a diameter of about 18 mm to do the task. I add the refractory mix in small portions and quickly tamp down each addition before adding the next one.
For Puck 1 only, I inserted another tumbler to act as the overnight compression device with a 10kg chunk of a railway line on top and flooded it with water and left it to set up overnight (Attempting to mimic (Mis)Adventures method).
For test Puck 2, to the dry mix in a mixing bowl, I added water and quickly stirred it with a broad silicone rubber spatula and transferred the mix to the mold and tamped it down. No further compression was applied.
For test Puck 3, I measured the volume of the 50g of dry mix in a tall container. Then I filled a second identical container to about the same level with unground perlite. In a mixing bowl, I first mixed the perlite into the mix with a silicone rubber spatula. “It wasn’t easy, like trying to mix rice bubble cereal into cold milk.” Then I added water to the mix and quickly stirred it in. “The mixing of the perlite was somewhat easier in a wet state.” Then I transferred the mixture to the mold and tamped it down. No further compression was applied.
[Add a photo of the tumblers and the compression arrangement when available]

Setting, curing and drying. All the test pucks, in Part 1, were allowed to cure/set to a sold state for ~12h* overnight before stripping the moulds.
- Note: When using a wetter mix, extra time may be required before stripping off the mold to get a clean release. Release oil, or possibly a thin plastic liner may allow earlier release.
To promote quick and even air drying the temperature was casually ramped up from ~50C to ~200C over the day. The pucks were first allowed to air dry near the top of a wood-burning heater, then on top of the hotplate (on ceramic disks to prevent direct contact with the hotplate) and then on the hotplate and under a heat trap cover. The improvised heat trap cover was made from an inverted and insulated coffee tin and was used to cover the pucks to achieve the high drying temperatures
Challenge by fire. I am reticent to use the word firing, as for my previous refractories, as I didn’t believe (at the time) that this heating step causes any significant chemical or physical change (other than maybe a little more dehydration) to the DIY calcium phosphate refractory.
In the evening, after the daytime drying described above, the pucks were placed in a deep bed of hot glowing charcoal and they were covered with more chunks. The charcoal was hard ‘clinky’ chunks that were residual from burning thick and dense blackwood logs.
The combustion was allowed to proceed for about 30 minutes and the pucks glowed with an incandescent colour that matched that of the glowing charcoal. The estimated temperature was about 1,000C.
Hardness and texture of test pucks. Before and after firing all the pucks had a soft texture that could be easily scratched with a fingernail. Puck 3 additionally had many shallow voids where the refractory matrix was not filled in between the course perlite granules. It had the texture of the rice bubbles in those wicked kids treats that were called ‘chocolate-crackles‘. I felt that a smoother and harder surface would be desirable to create a functional refractory.
Consequently, after the first firing ( Unfortunately before taking a photo), I hastily rendered one-half of Puck 3 with one of my favourite DIY refractory renders. It survived a second firing with flying colours. “The surface that could previously be scratched by a fingernail can now be used as a nail file!” The rendering process will be the subject of another part of the post.
Results and discussion of DIY calcium phosphate refractory
Wet mixing versus soaking and compression. Pucks 2 and 3 became uniformly solid after an overnight reaction period. Puck 1 was essentially solid, but there was a small area in the middle of the bottom of the puck that looked less wetted and felt soft when touched with my fingernail.
I gently put a few drops of water on it and it was obviously still reactive. Some bubbles blew out and caused a thin layer of material to flake off. It left a small depression while the rest of the soft portion went hard within minutes.
I think the reported flaking in the (Mis)Adventures video may more likely be caused by inadequate water permeation during the soaking method rather than a lack of compression as suggested. My use of plastic molds, instead of wooden ones, would have exacerbated the poor wetting at the bottom of the plastic mold.
- Note: The above observation clearly indicates that the flooding water can not easily migrate through such a small distance in the setting refractory. Consequently, it seems that it would be an inappropriate method to use when creating a monolithic refractory with considerably greater thickness, particularly when using watertight molds. Wet mixing would be much better.
Overall, I think wet mixing without compression shows considerable promise to be an easy way of making calcium phosphate refractory items.
Indications of extended reaction duration. The reaction of the calcium hydrogen phosphate and lime heated up Pucks 2 and 3 to a comfortable warm temperature (determined by hand contact with the mold) during the first 2-3 hour of set up. I could not feel the Puck 3 temperature because it was flooded with water and was probably cooled quickly by the mass of flooding water.
This extended heating phase indicates to me that the critical exothermic reaction between calcium phosphate and lime continues for quite some time.
Similarly, the top surfaces of Pucks 2 and 3 were soft to the touch below the shallow (accidental) liquid surface for some hours after their placement into the molds. Eventually, the tops of the pucks became equally solid, even just below a layer of liquid. This also indicates to me that the set up or reactive time is not so short.
If we think of the reaction steps involved, both chemicals have a very low solubility in water and must first dissolve into the water. Then they must dissociate into ions before they can first react to form calcium hydrogen (mono) phosphate and then secondly to form calcium phosphate. This will take a considerable time and I expect that the reaction will take a long time to complete, as with Portland cement.
Does excess water slow the reaction? Pucks 2 had a thin film of opaque liquid (~2mm) that I presume was from a slight excess of water in this first experimental mix. It rose to the top during tamping. Puck 3 was also flooded with even more of the opaque liquid (~5mm) and was noticeably slower to harden (on the top) than Puck 2. “See I am a slow learner! But mistakes sometimes provide breakthroughs.”
“To summarise my speculation, I think the flooding method causes lock up and the appearance of fast setting and also slow water penetration through the stiffening mix. In contrast, sloppy mixing causes, the even distribution of water, even reaction throughout and an adequate pot-life with easy mixing and any excess can simply rise to the top. Analogous behaviour can be seen with Portland cement that is mixed with insufficient water or too much water.”
Change in the refractory with high-temperature heating. At first, I thought that the calcium phosphate/ lime reaction was simply completed at low temperatures and that the heating to 1,000C was just a challenge by fire to test the refractory property of the puck. “After all, it was supposed to be fully reacted!
However, in my limited testing of my refractory, I sensed the surface of my pucks changed to a harder feel after firing. “More snooping around about the chemistry indicates that it is much more complex, so there goes my castable refractory that is ready from the mold.” This will be investigated in a future part of this post.
Shrinkage. There was negligible shrinkage during the moulding. This makes the release from the mold a little more difficult. On the other hand, zero shrinkage is highly desirable to prevent cracking, allowing satisfactory bonding, glueing and lamination to other DIY low-shrinkage refractories.
Temperature limit for perlite calcium phosphate and whatever. If what our reaction produces is pure calcium phosphate (I doubt it) it would have a melting point of 1,670C. At least that is a nice aspirational target.
In my limited experience with other refractories, exposed perlite insulation starts to soften and melt some way beyond 1,000C temperature (or at the limit of my thermocouple ~1,200C) and this has usually been associated with the use of alkaline sodium silicate that can cause fluxing due to the sodium content.
The melting point for perlite is 1,260C* and it is 1,330C for vermiculite. I actually prefer vermiculite over perlite as it does not have the obnoxious dust of perlite and its platelet structure often improves the workability while molding, surface texture and strength. It also makes it a delight to cut, machine or drill the cured refractory when shaping, holes or tunnels must be made in it. “It is often easier to machine such features rather than forming them by complex molding.”
- *Note: Charcoal combustion with forced air, as in my Nebuchadnezzar furnace, can also, by chance, theoretically reach 1,260C (perlite’s melting point). So it makes sense that I see perlite insulation starting to melt while vermiculite does not.

Refractory component melting points. Lime (Ca(OH)2) has a melting point of 580C. For calcium dihydrogen phosphate the melting point is only 200C. Anyway, with these melting points, it would be wise to ensure that there is no great excess of either remaining in the mix.
- Note 1: I went on to search for the decomposition temperature for lime (Ca(OH)2) into quicklime, calcium oxide (CaO) is also 580C. “That is rather odd. Does it melt and then react or react and then melt? “
- Note 2: Since preparing Part 1, I have discovered that after 1,000C firing our calcium phosphate turns into calcium pyrophosphate (melting point 1,353C). “So, all this means that I think it will have to be a case of suck-it-and-see as it will be difficult to predict what might happen according to theory alone.”
Conclusion- DIY calcium phosphate refractory
Despite possibly having the wrong name for it, DIY calcium phosphate refractory seems to have great potential as a DIY castable refractory material for those who wish to make long-lasting things that can contain and insulate very hot combustion while tinkering.
Contrary to prior expectations, the crucial hydraulic reaction for setting takes several minutes (or even days) which allows for easy mixing and casting. A slightly sloppy mix appears to extend the pot-life and makes thorough mixing and water distribution very easy. This mix also makes molding and tamping or consolidation very easy. “It may cause a small delay in the ‘wait time’ for mold stripping, but tinkerers are good at waiting because they always have something that is more important that they should have done yesterday!”.
Finely grinding the perlite (As indicated by (Mis)Adventures) would probably aid good mixing and result in a finer and stronger refractory surface finish. Insulation other than perlite may be safer and nicer to work with and could have a higher melting point.
The softness of all the test pucks will not be very resistant to surface wear, but a DIY hard hot face render may make the surface harder and also provide extra thermal protection (As will be discussed in a future part of this post).
So far I am delighted with this refractory (new to me) and it should be good for up to 1,200C or up to the temperature limit of the refractory insulation. I expect to find multiple ways to extend this limit to 1,500C with thin refractory laminates or coatings without perlite or vermiculite in them. I will be curious to find its upper-temperature limit and its long-term survival in high-temperature heat cycling applications.
This brief investigation has answered the castability question. On the other hand, it has opened up so many more questions. Hopefully, the answers will guide us to an even better understanding of the process and improved DIY methods that we all can use.
I would also like to thank (Mis)Adventures in Materials for generously sharing his great ideas that have inspired me.
Part 2. -Calcium phosphate refractory reaction, curing and firing insights
Background
I started this project thinking that the reaction of calcium phosphate with calcium hydroxide was quite a fast and simple acid/base reaction. Slowly, I found out that it was not so fast and probably not so simple. It seems to be likely that the full acid/base reaction is quite slow and the subsequent cure at high temperatures is quite complex. It is likely that after curing at very high temperatures it may not even be calcium phosphate any more!
Unfortunately, I could not find a direct reference to this particular reaction between lime and calcium dihydrogen phosphate in the context of a refractory. “The online literature is understandably taken up with numerous dental and biomedical bone applications which are far more important than a tinkerer’s interests. A paper in the prestigious Journal Nature: Calcium phosphate cements for bone engineering and their biological properties is just one example of many.” So, please help me if you find something that I have missed and is pertinent to this project.
New insights into calcium phosphate refractory reaction, curing and firing
Time for set up? I did find a paper on calcium phosphate cement composite that related to refractories. Although the reaction, in this case, was between phosphoric acid and calcium silicate, it does suggest that the reaction is not so fast. It describes the composite being kept in the mold for 24 hours with a plastic cover to prevent dehydration. Then after the release from the mold, they were cured, covered with a plastic film, for a further 14 days to become quasi-stable. “Although I am naturally a bit impatient, I will observe the one day plus many more days in my curing process, as a precaution, in future test pucks. However, it will slow the project considerably.”
Changes during curing and firing? The above paper indicates that the calcium phosphate refractory can withstand a 1,000C temperature and that it does undergo shrinkage, microstructural changes, the formation of cracks and voids, healing of cracks, phase changes and even conversion to a chemical that is no longer calcium phosphate! So this may explain the changed hardness that I sensed after firing. The changes that they report are grouped into three temperature ranges after the initial set up.
First shrinkage phase. In this first phase, the changes include; more dehydration, shrinkage, cracking and reduced strength (20-200C).
Second plateau phase. This next phase (200-700C) accompanies more reaction toward calcium phosphate cement, further shrinkage, wider crack & void formation and the complete conversion of monetite (calcium [mono]hydrogenphosphate into calcium pyrophosphate (Ca2P2O7, two calcium phosphate molecules that have combined with the loss of a water molecule ). “This seems to indicate that the calcium phosphate formation is actually bypassed in this sequence of reactions. Who knows, but all the various forms of calcium phosphate seem to form refractory cement.”
Third glassy transition phase. Lastly, in this last phase (700-1,000C), recrystallization (of amorphous phosphates), crack healing and substantial recovery of strength. “I assume that in this glassy phase, that the pyrophosphate molecules fuse together to become a glass.”
Discussion
The starting acid phosphate in the above reference was phosphoric acid (orthophosphoric acid- the tribasic acid which is very soluble in water). By contrast, I started with a less acidic phosphate (calcium dihydrogen phosphate- a dibasic salt which is only slightly soluble) and, I expect, would react more slowly than pure phosphoric acid. However, their reaction goes through the hydrogen phosphate (monetite), (possibly calcium phosphate), and then to calcium pyrophosphate, so the reactions during firing should be somewhat similar in their slowness for both refractories.
It also means that we probably should call our refractory calcium pyrophosphate (melting point 1,353C). “However, I don’t think many refractory tinkerers will care or turn into chemistry zealots. But don’t tell the SEO zealots that my title is wrong! I think that it is funny that sometime one must go with the flow and have an incorrect title in order to be found!”
Conclusion
The bottom line to all this is that a long moist room temperature reaction time for many days should be used. Leaving the fresh molding in its non-porous mold, with a plastic cover, would be a simple way of achieving this. Alternatively, flooding the exposed surface of the mold with water should suffice. The eventual firing after thorough drying will make substantial changes to the composition and the structure of the refractory.
So it makes an earlier heading ‘DIY Calcium phosphate refractory with no need to be fired‘, in Part 1 look a bit silly, as it does need to be fired and it is no longer calcium phosphate and it is not exactly ready for fire straight from the mold!
Despite these more lengthy and complex reactions this simple castable refractory seems to be very suitable for DIY tinkering.
Part 3. A tough DIY coating for DIY calcium phosphate refractory
This is a short post about applying a DIY refractory render to protect the soft surface of DIY castable calcium phosphate refractory items.
The simple DIY render can provide a refractory item’s surfaces with a greater hardness to resist wear and to be more heat resistant. The render can also smooth a surface and bind otherwise lose and flaky particles.
The DIY calcium phosphate refractory Pucks 1, 2 and 3 from Part 1 of this post series were used to demonstrate the coating. These pucks all had a soft texture that could be easily scratched with a fingernail. Puck 3 additionally had many shallow voids where the refractory matrix was not filled in between the course perlite granules that were used as refractory insulation. The thick render can largely fill these voids.
The render is my favourite versatile and ‘bulletproof DIY refractory coating that can be made from an admixture of sodium silicate, talcum baby powder (MP 1,500C ), iron oxide (MP 1,475-1,565C) and aluminium oxide (MP 2,054C)*. The recipe is described in my rather long cornerstone refractory post; DIY refractories from sodium silicate- “Born in fire to survive in fire” under the heading of: REFRACTORY; RENDERS, FILLERS, ADHESIVES AND THE ‘TRACES OF MAGIC-REFRACTORY-STUFF’ THAT HELPS IT ALL HOLD TOGETHER IN HELL FIRE.
I don’t know what the combined melting point is, because I have never caused it to melt. Once understood, it is a simple, versatile and cheap render that can be applied as a paint that is thinner than tissue paper or heavy as an old tart’s makeup.
*Note: The baby powder is included to make the render viscous for brush application with minimal ‘running’. Iron oxide is not a critical refractory component. It is included to give the render a dark colour so that it is easy to judge the adequacy of the cover of the render and by necessity, it is a refractory and it may have a small fluxing effect. The aluminium oxide is mixed in separately when a thicker cover is needed and when more wear protection and heat shielding is needed. “I usually dabble the wet brush in a little dry aluminium oxide powder to get the appropriate consistency for the task in hand.”

COATING THE CALCIUM PHOSPHATE TEST PUCKS
After the first test in firing, I rendered one-half of each Puck with one of my favourite refractory sodium silicate renders as described below. I thought that coating only half of the puck would provide an ongoing contrast between the robustness of the original and new surfaces as I expose them to more heat cycling.
Three thin layers of render, without aluminium oxide added, were first applied with a brush. The thin liquid soaks quickly into the soft surface substrate and helps the particles bond together better and become stronger.
Then I applied progressively thicker render (with more and more additional aluminium oxide powder added to the wet brush) so that it filled the voids and left a generous smooth coating. It is not an exacting or difficult task and is easy and quick to dry (~120C) and cure in preparation for firing (~250C). It is much easier than the more problematic thicker sodium silicate refractories described in the introduction to this post series in Part 1.
“When I set the pucks into glowing charcoal to finally cure they briefly give off the sweet perfume of roses as a little reminder of its soft baby powder content. When they return to our realm, gone are the roses and softness as the new surface turns as hard as aluminium oxide sandpaper.”
“Although the initial puck surface can be scratched with a fingernail, this new surface can now be used as a nail file.”

Tim
Hi,
Very nice to see your website and your posts! I have been experimenting with calcium phosphate cements and have a few castable recipes that I have tried and I have recently build a batch box RMH with it.
I used this recipe tot cast molds for my heat riser. Outside temperature was around 20 °C and the casting time is very dependent on this:
Recipe is in Parts by weight:
20 H3PO4 (75% solution)
25 H2O
40 CaSiO3 (wollastonite)
6 perlite
2 chamotte 0-1mm (slows setting time and possible calcium aluminate formation after heating)
0,1 citric acid (slows setting time)
Mixing liquids and citric acid first, then chamotte and wollastonite, then perlite. Best results with leakfree molds. Temperature can go up to 100°C. Setting time of a few minutes.
With lower outside temperatures citric acid might not be needed.
For denser mixtures you can use black iron oxide/wollastonite 1/3 and less water and some aggregate. (Ik want to try aluminum oxide grit but haven’t got the chance yet).
Hi again Tim. Another interesting article.
Just wondering on your source of the calcium hydrogen phosphate, or any other places it can be purchased for reasonable cost?
Looking around all I could find was either lab or food grade, both very expensive. I had hoped to find it was used for an industrial purpose and could therefore be found less pure but much cheaper, but I haven’t been able to see either that use or a cheaper source.
I’m just looking at this for making a small forge for heating metal items in the garage/workshop. I may be better off using one of your other methods for achieving this.
Thanks for the effort of sharing all your insights and knowledge on this site. I refer back to here quite often for various projects and ideas, both outdoor related and in the garage making things.
Cheers, Stuart
Hi Stuart, You could try a big building supply store. Another alternative would be paper clay. In my experience red clay works best as it has a lower firing temperature than white clay. The outside of the forge could be a denser mix of paper and clay for strength, while the inside could be low density (maximum proportion of paper to clay 50/50) for good insulation and thermal shock resistance. Hope this helps and please let me know how it goes. Tim
Awesome, thanks for the reply. I did wonder if paper clay would also work so you have also answered that question.
Doing a bit more digging I’ve found that it’s also called dicalcium phosphate and available as an animal feed supplement for much more reasonable prices.
I’ll get around to trying something soon, just got to get the energy to actually make it happen.
Really appreciate your help
Thanks, Stu
This is very impressible and informative. Thanks a heap for writing this down. I’m looking your other post too and am equally impressed with them.