
Pyramid tent pattern – A modular DIY system
Pyramid tent pattern that is DIY modular, flexible and compact is explored for DIY pyramid tent makers.
Introduction and background to a pyramid tent pattern
Note: This post is a work in progress and will be completed as the ideas flow in their own good time and as time permits. Even in its incomplete form, it should stimulate fellow DIY pyramid tinkerers.
If you make DIY pyramid tents patterns, you would appreciate the effort that is involved in getting the planning and cutting pattern right, hopefully before you commit to that first cut! Working with fabric that is soft and slippery and even warped in the roll is difficult to make consistent and accurate cuts. I think that these challenges often prevent people from making that first step of making their own custom mid. Hopefully, this post will encourage that first step.
My traditional pyramid tents pattern.
I have created a spreadsheet model to help to design various pyramid tent patterns (Hexagonal, Rectangular/square & Square tent with vestibule). Fortunately, these can easily be used to make precise small scale, thin paper models that can show that all panels fit well in the 3D model. “Hopefully it will relate well with what was in your head.”


The full-scale pattern for the tent dimensions can then be accurately and effortlessly determined for any scale from the above spreadsheet models. My full-scale patterns have traditionally been made up of composite pieces of single-ply light cardboard. I roll up the big triangular pattern pieces to store them safely.
Limitations of a cardboard pyramid tent pattern
Unfortunately, such patterns continue to try to roll up (or hump) while trying to use them in their laid out form. Using weights and ironing of the pattern has worked.
[Add a photo of a paper pattern with rocks and stuff holding down]
Such a cardboard pattern has been OK for my simplest designs that only have one pattern piece that can be used systematically from the front (A) side or the back (B) side and with different fabric grain orientations. The layouts shown in the two photos below show the A and the B layouts for my tent design where all seams are arranged to have a straight grain paired with a bias cut edge.


Also, for my small changes in the tent design (eg adding a wall and snow skirt), I have been able to add extra cardboard to the original shape, but this approach is rather limited when more ambitious or complex changes are required. However, changing the apex angle is not practical.
Accommodating variable designs in a pyramid tent pattern
The use of the rectangular tent design model allowed me to conclude that a simple square pyramid tent was more efficient than a rectangular one. It was more effective for providing multiple campers with a sleeping place and storage room for their gear. I now have simple pyramid design models that use a fixed set of tent panel apex angles. With these fixed angles a tent of any size can be simply scaled to any requirement according to a single base length measurement of the square pyramid.
It also can allow the designer to optimize the design according to the available fabric width or conversely purchase a fabric with the most appropriate width. Consequently, I thought it would be nice to have a single pattern that could grow or shrink according to any design scaling. As I was preparing this post, it occurred to me that it would be the ‘icing on the cake’ if the pattern could accommodate different panel angles, lengths and shapes if ever required.
My latest Square tent with vestibule model modifies the front face (doorway) of a standard pyramid to become a vestibule (as shown in the paper models above). It is particularly designed for harsh but wonderful winter living conditions. This design improves sleeping spaces, comfort, ventilation and improves the wet entry area during rain and snow while maintaining the ease of walk-in (or stoop-in) access.
In short, the vestibule vertical entry can open up good ventilation while keeping the rain and snow out of the bloody tent when the bloody door must be opened. I think the reward from the extra effort will be the conversion of a pyramid tent into a winter place while only increasing the fabric weight by 13%.
Mothy The Elder
The complexity of such a design means that it will require four extra pattern shapes to be created. The remaining challenge was to be easily able to translate the precise dimensions from the model to simple, flexible, robust patterns that would be compact and easy to store.
Magic angles, lengths and their manipulation in pyramid tents patterns
For my simple pyramid designs, all the panels have a right angle and these are very simple to plan and cut efficiently. Similarly, 45-degree angles are another sweet, efficient and easy angle to use in DIY tent designs. Also, panel lengths that equal the fabric roll width (as many other panel widths should) are another welcome economical design feature for a DIY tent tinkerer.
When using the early iterations of the vestibule portion of the design model I found that some of the panel angles were very close to 45 degrees and some panel lengths were close to the ‘magic’ fabric roll width (FW, or half of the pyramid base width).
Consequently, for the vestibule part of the model, I could tweak the height of the doorway, while maintaining a comfortable stoop in winter entry height, so that the vestibule doorway height equalled FW and the door panels became 45-degree right-angle triangles with two sides of FW length. “Just imagine trying to make those subtle adjustments in your head as you go to sleep at night without a spreadshit model.”
From scissors to hot cutting
I progressed from fabric cutting with scissors to soldering iron and this was a great improvement. However, the soldering iron was slow to heat up to a fast cutting temperature and was clearly not going to stay serviceable for very long as the soft copper blade bent and developed a loose fit in the heating coil.

Now I have a formal fast response fabric hot knife that is a delight to use. With both devices, hot cutting had another unexpected benefit. The knife can be effortlessly and precisely guided along a straight edge (made from scrap sheet metal) to easily make long straight cuts.
This means that the distances of the three corners of the triangle are paramount and the precision of the three straight cuts no longer depends upon the ‘straightness’ of the pattern sides.

I only purchased one of the many possible blades for the knife. When I first tested it, I felt that it was unnecessarily sharp and scratchy against the backing sheet. Consequently, I used aluminium oxide abrasive to ‘dull’ the sharp cutting edge to make it rounded.
The ‘cut’ is still amazingly fine. The blade, shown in the photo, also easily cuts all sorts of other things including rope, seatbelt webbing and thick or thin plastic containers and can also do plastic welding as used and described later. “Expect another post titled ‘Other uses for a hot cutting knife’ as its uses will be endless for inveterate tinkerers.” The extent of the natural red glow from the blade can be used to easily monitor and regulate the cutting temperature (by pulsing the power trigger) during very long cuts.
Stable cutting
The hot cutting also does not disrupt the location of the fabric while the cut is being made (as scissors do). Instead, each side of the melted cut is temporarily stuck to the backing strip while the cut is being made. This makes the cutting; easy, accurate and more stable than when using scissors.
The melted fabric edge is lovely to subsequently sew with. Seams can be much simpler. Gone are those pesky fine loose fibres of tent fabric that continue to fray from scissor-cut edges and tangle in the sewing machine, the vacuum cleaner head and any other textured object including my farm battered hands. I should have had a hot cutter years ago as I still tangle with stray fibres from previous tents. This is a must have tool for a tent tinkerers tool kit.
Mothy The Elder
Metal or wood as a backing plate for hot cutting
Hot cutting against plywood worked well with both hot cutting devices. However, the wood surface rapidly becomes unserviceable as the burnished/burnt grooves accumulate with each successive cut. I now use a long backing strip made of scrap colorbond steel sheet metal. The hot cutting knife leaves visible marks on the colour bond coating, but it does not spoil it for subsequent cuts. It is a very cheap and effective backing sheet and its magnetic attraction is another benefit for laying out patterns is described later.
[Add a photo of the very limited marking of the colorbond surface after making several hot cuts]
Selvedge trimming
Before my use of hot cutting when using silnylon fabrics, I tried to incorporate selvedge fabric edges directly into my tent panels. It saved cutting and these edges were easy to sew without loose fibres. It made trustworthy starting lines for laying out pattern pieces. “Any irregularities along the edges would be folded and incorporated into the lay flat seam and would be hidden forever.”
When I moved to the use of silver-coated breathing polyester fabric, it had a much bigger selvedge band with cosmetic irregularities that would be too big to be hidden in the seams. Consequently, easy cutting off with a hot cutter was a simple solution that would avoid ugly bands of odd colour along some seams. “Even these long strips of neatly cut selvedge off-cuts can be used for tent making. They make supplementary tensile bands to use in hidden locations on a tent. They are all the better to use for not having fraying edges. “
Is a simple modular pyramid tent pattern possible?
“Sorry for such a long introduction and background, but I think you would agree that it was important to set the context in which I use such a pattern.”
A pattern from a braided fishing line
I started making a pattern with discarded braided surf fishing line. It has almost no stretch, is strong enough to cut off a finger and can be rolled up very small for storage.
I attached little pairs of tabs to the line. They were made of folded hardened stainless steel foil and acted like jamb cleats to lock onto the braid at set distances from each other. With some effort, they could be slipped along for small adjustments or taken off and replaced for major ones.
The plan was to use the junction between the tabs to mark the corners of the pattern. It was fully adjustable and compact but was tanglesome (as braided line always is). It also was difficult to annotate with datum lines etc and was difficult to set up and adjust according to a steel tape measure. Corner anchors were required to gently pull the pattern into its correct shape. These anchors, such as pins, prevented the easy adjustment of the fabric alignment below the pattern. “As with most of my first tries at something unusual, it was not a success, but the act of trying gave birth to a better method.”

A pattern made from hardened steel builders tape
After this unsatisfactory fishing line pattern and feeling a little dejected, I brightened up as I looked at my untidy and un-retracted builder’s tape that I had impatiently left stretched across the carpet. “I could instantly see that such a feisty hardened steel tape that was ten meters long could be cut up into sections.
Each section would fight like mountain lions to stay straight, stiff and true to their calibrated length. They could make an excellent pattern to provide precise length measurements for the distances between the three corners of the triangular pattern. They even have a bright enamel surface on which to clearly note their lengths, intended use and other important datum lines (stitch/ends, tie-out tabs etc) with a permanent marker pen.
Note: On the subject of marker pens, I have found that many do not mark well enough on silnylon or polyester. The marks can rub off or just disappear before the mark can be used. This fine Empire permanent marker has none of those problems and works permanently on all tinkering surfaces so far. “When they say permanent, they mean permanent!” The pen can be used on parts of the fabric that will be hidden inside the seam. This works well when the tie out tabs can be glue tacked and embedded in the seams while the lay-flat seam is being prepared for sewing.

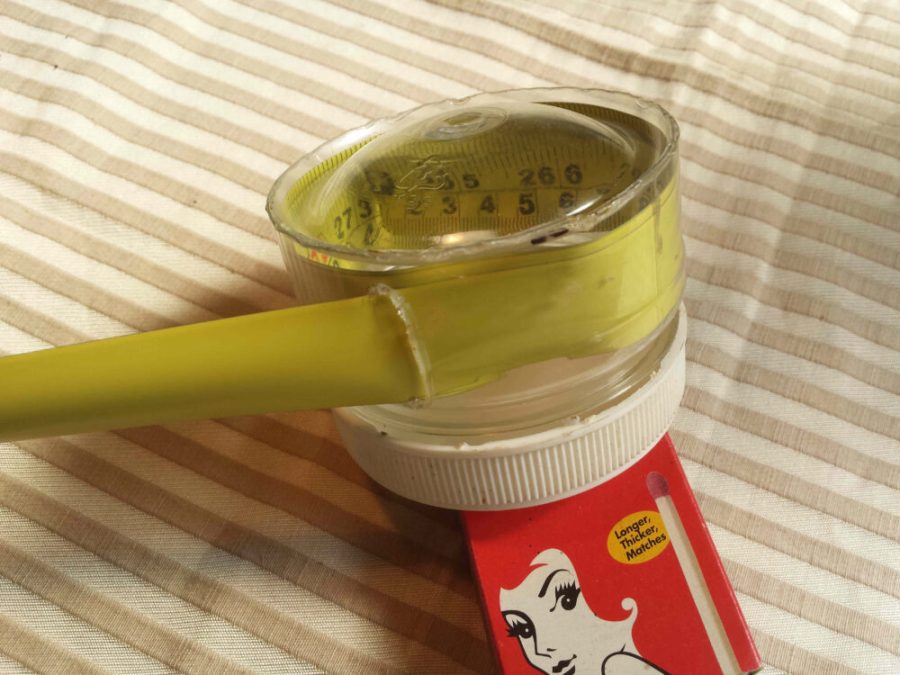
“I had a primitive prototype steel tape given to me by my grandpa (made with a simple open-faced cup that stored the metal tape that was not even painted…… that’s how old it was). I knew I could store all the tape segments easily, safely and compactly in such a simple storage device.
Fixed angle terminal brackets for the steel tape for a pyramid tent pattern
The next solution came easily. I made multiple ~150mm long terminal ‘legs’ for the ends of the sections of tape. I used scraps of my ‘go-to’ 0.1mm thick hardened stainless steel foil to make the legs.
The foil is as light as feathers and almost as feisty as the steel tape and the two have a good match that could have been made in hell. “The little almost invissible cuts on my fingers tell the story.” However, a difference is that the tape is strongly magnetic and the leg is non-magnet (or only weakly so after tight bending). If you don’t believe me try a magnetic test on your SS kitchen sink, the bends are magnetic and more strongly so where the bends are tighter.
Mothy The Elder
The legs were given folded edges to make them less like scalpels and also to tightly grasp about 50mm of the end of the square-cut ends of the pieces of builders tape. This connection also aligned the leg with the edges of the tape so that the edge of the pattern would stay straight. The pacification of two scalpal like edges in such a harmless union is a bit like that saying about two nasty people that become partners: “Better a union that ruin two lives than four!”

Next, I welded the legs together at appropriate angles, according to the small scale paper model that I had previously made. Then at the somewhat ugly terminal point, I cut off the point to leave a much nicer flat. “Still nasty!”
Then I inserted and welded a small piece of 0.3mm thick SS sheet metal between the metal sheets. It had a pinhole punch-formed in it. “I punch such holes as I never bugger my best fine drill bits by drilling SS if I can avoid it.” The end near the hole was generously rounded for safety. The position of the hole was adjusted until it aligned perfectly with the outside edges of both legs (by visual sighting along each side) before welding in place.
The hole can be used for an anchor pin if needed to get started with aligning the pattern with the fabric (shown in the photo below). Now I only use magnets for this purpose. I also used the hole as the reference point from which I can easily scribe a permanent datum line (using callipers,) on each leg at 100mm from the hole. The lines mark the proper terminal point for the end of the tape section. This meant that when a length of tape was cut it would need to be precisely 200mm less than the triangle side length required for the pattern. This was standardised for all legs so that all pieces of tape would be interchangeable.
Note. Most tinkerers won’t have an inexhaustible supply of thin hard SS foil or a micro welder. However, cut strips of smooth coffee tin sheet metal would suffice to make the legs. Even better would be aluminium foil from soft drink cans. This would also allow magnetic field to pass through to the steel backing strip for magnetic clamping. Also, glueing (with builder glues) would suffice for the welding as the fitting should only experience gentle forces when used for laying out the pattern. “If it should happen to accidentally collide with something at speed, you will probably be happy for it to bend or break!” Next, I will describe a corner brackets with a flexible angle that can be made with any light sheet metal.

Terminal brackets with adjustable angles for pyramid tent pattern
“As soon as I started to weld the first bracket together, a little bird on my shoulder said: This angle could and should be flexible!” Such flexibility would enable the making of patterns for my more complex tents such as the pyramid with a vestibule.
Each leg can have its own locator pinhole that can pivot on a common pin to allow the angle to be adjusted, within reasonable limits, to the desired angle. In this case, it would only be the triangle leg lengths that would be setting the angles of the triangle. In my experience, long side lengths do this much better than any angle setting device such as a protractor or set square can.
It is just so easy for small projected angular errors to be multiplied to become large linear errors on tent panels. It is easy to think that long triangulation would have been involved in the construction of the pyramids of Egypt that only have a 14.4cm out of square error over 23,025cm base width (0.06% error). How appropriate for a tinkerers pyramid tent!
Mothy The Elder

The above adjustable brackets worked well, but the ends were a bit ugly and I needed another one to make a pattern for the vestibule on my newest tent. It was a chance to make the improved Mk11 shown below. ” I don’t know about you, but I find that simply doing is learning?”

Tape joiners for a pyramid tent pattern
To enable totally flexible pattern forming, with minimal waste, I used some ‘leg section blanks’ to form steel tape joiners. These allow extra length to be added to or removed from the side of a triangle to make it fully adjustable.


Marking datum lines on the pattern
I find that it is best to mark all datum lines on the tent panel seam lines just after cutting the tent panel. The marking can be done directly from fixed marks on the pattern This ensures consistency and reduces the risk of forgetting to make the marks.
Marks on the corner brackets. I use three scribed lines on the apex angle bracket. These scribed marks conveniently show through on the reverse side of the brackets. As an example, the first one (4cm from the apex) marks the start of the seam stitching and this leaves a hole for the attachment of the load-bearing hem when the panels are sewn together.
The second line (7cm from the apex) marks the end of the overlapping load-bearing hem attachment line. When the panels have been sewn together, these marks will pull out in a straight line while the load-bearing hem is being attached with multiple rows of ganged straight stitches.
The third line (10cm from the apex) is the datum line that is used to set the proper alignment of the ends of the calibrated lengths of the steel tape.
Marks on the tape measure sections. When it came to marking datum lines on the steel tape, scribing was difficult and the lines were not easy to see, particularly on the side of the tape with printed calibration markings. Instead, I found that a wrapped patch of brown packing tape made an excellent semi-permanent marker. It was easy to find, could be annotated with a permanent marker to describe its purpose and could be replaced when needed. This wrapping also allowed the mark to show on both sides of the tape when the pattern was flipped over to use its other side.
Examples of these marks would be for mid seam tie-out tabs, eve-tie out tabs, pyramid ground anchor points and end of seam stitching where the tent panel transitions into a snow skirt. As described in another post, I integrate the tie-out and peg-out tabs into the lay-flat by glue tacking and embedding the tabs within the seams while they are being formed. “I find the attachment of tie-out tabs this way makes them simple and very strong and it is much easier to complete the task while sewing each new panel seam than retrofitting them to a massive tent canopy!”
Transfering the marks to the tent panel. I transfer the marks from the pattern to the tent panel with a permanent marker pen after cutting the panel edge. I make the marks mainly on the portion of the seam allowance that will eventually be hidden in the roll of the lay-flat seam when finished. The mark can be extended a little to show beyond the seam when this is required for example for the retrofitting of a load-bearing apex hem.
Wide steel backing strips
I use wide steel backing strips that can support the wide aluminium cutting straight edge. This means that the backing strip is a ‘big target’ and its location needs to be less accurate. Also, part of its width can be used for magnetic clamping of the fabric with strong rare earth magnets as described later. If the backing strips have very straight edges (cut by a guillotine), these edges can be used to establish a straight alignment of the edge of the fabric before cutting commences.
Firm work surface for backing strips
Initially, while using the pattern to cut out tent panels on a carpeted floor with a backing of thick soft under-lay, I found that the fabric would shift whenever I stepped on it to move around it. Luckily, before I had introduced the metal backing strips, I had made a large triangle of plywood on which to do the layout and cutting. The support that is provided (over the carpet) prevented the fabric movement when carefully stepping on the fabric. Consequently, I deployed the plywood triangle with the metal backing strip on top and this addresses the fabric movement problem. I expect that working on a firm concrete or wooden floor or similar would also work well. “I had put quite an effort into making my plywood triangle that was apparently redundant. So I was happy to see that it worked so well in combination with the metal backing strips.”
Seam allowances for a pyramid tents pattern
My models calculate panel dimensions free of seam allowances and my patterns mimic this. Consequently, these allowances (typically 10mm for a targeted 7mm wide lay flat seam) must be added. Two simple 10mm spacers can be placed between the pattern and the ‘cutting straight edge’ at external corners of the triangular pattern. These spacers can conveniently be 10mm wide rare earth magnets. They have a multitude of other uses for tent making and other tinkering.
This approach means that the cut line will:
- Be straight, regardless of the the shaping of the edge of the pattern,
- Not need to be marked as the hot knife can simply follow the straight edge and,
- The seam allowance will not easily be forgotten.

More rare earth magnetic magic
Making adjustments to the straight alignment of the fabric selvedge edge (or any other edge) prior to cutting is tedious. However, it is a critical operation to start the accurate cutting of most pyramid tent panels. At any particular point, it is nice to be able to lock the alignment down to the steel backing plate before moving on to complete the next adjustment. As mentioned previously the straight edge of the backing strip can be used to guide this alignment of the fabric edge. Strong rare earth magnets are just magical. They make it less like wrestling an eight-armed Eoandromeda octobrachiata.”
Such magnets have a holding characteristic that easily allows subtle fine adjustments to the fabric alignment by pulling the fabric in, out or along beneath the weight of the metal straight edge while the magnet is left in place. “When removing the magnet this can easily be done by sliding them off, rather than trying to pull them off directly against the strong magnetic force.”
Note: Light tent fabric can easily be distorted from its proper flat square lay according to its warp and weft. I use the tel-tail wrinkles in the fabric to detect and correct such distortions before cutting This can be achieved by subtle pulling or easing of the fabric beneath the straight edge to correct the distortions. The magnetic holders make such adjustments easy to do and fine-tune.
Last laugh about using rare earth magnets and steel tapes
I first started using rare earth magnets for my tent making when using light cardboard patterns or fishing-line patterns. I fixed a small patch of steel tin-plate (flattened wall of a coffee tin) to the corners of the plywood triangle to make convenient anchor points.
I was quite dismayed when I first used them near the cut line on my new steel tape patterns. The little magnets could easily pull the otherwise straight tape out of line from 3 or more cm away.
It was then that the penny really dropped when I realized that with the new pattern system the corners of the pattern when combined with the cutting straight edge were setting the accurate cut line, not the edges of the pattern. Consequently, the magnets can still be used as fabric holders, but they are best kept well away from the steel tape.
Conclusion about a modular pyramid tent pattern
“I don’t know if this is obvious to readers of this post, so I will emphasise it in the conclusion, at the risk of being a boring old fart.” I have learned that for a triangular tent pattern to be absolutely accurate and effective for use with a cutting straight edge, the shape of the sides of the triangle is inconsequential. If the corners of the pattern are accurately set at the correct distances from one another that is all that matters. Here is a jar of those critical measurements.
[Add a photo of the many tape sections that have been stuffed into their storage coil with their labels sticking out, alongside a redundant and bulky cardboard pattern that has been tied up with string.]
This post would also not be complete without a finishing ode from the tinker.
A big pattern from cellulose fibers, could another be more fit?
On my precious tent fabric to lay flat and precisely sit,
Would steel stolen from my tape measure be my pleasure,
So  feisty and stiff, makes a perfect triangle measure,
Till the next tent it lives in its coil, when I say suffit.
Tim
Hello Tim! I am a student at Washington Liberty High School, while working on my senior design project, I stumbled across a couple of your articles. I am trying to design a tent that folds and compacts into a rucksack that can then store camping supplies, however I am not sure of my panel design, and would love to bounce ideas off of someone who has had experience in tent design.
I am currently undertaking a project looking specifically at shelters for homeless people in an urban, inner city, environment, so I’m looking at structures that eliminate the need for in ground anchoring. Do you think that the tent could support itself with just a rigid arch structure over the top? I understand the need for resistance against the elements, so the tent doesn’t fly away, but I would hope that the user would be able to be inside their tent and safe from the elements. Also, their personal belongings would be inside; part of my design criteria I have set for myself is that while in “backpack form” it holds 40lbs/40-60L.
Also, I have never constructed a tent before, so the physics of tensioning fabric over a skeleton is completely foreign to me. I can imagine that I would run into an issue when opening the door, if I used that section of fabric to keep the tent’s shape, then when that panel opens, will the whole structure collapse? I don’t really know what issues I am trying to troubleshoot, so I would be so grateful for any tips while building this.
Hi Kamryn, Thanks for your questions. Your project for homeless people is commendable but is quite a challenge. I sometimes imagine what I would do if I was in such a situation and think that my lightweight camping skills would be a big help. However, when the urban environment is in the mix it makes many simple camping options unsuitable.
My practical tent design and making is limited to pyramid style or bell tents with a single centre pole and another bush pole when needed for a vestibule entry. With all my designs the poles can be substituted with cords hanging from overhead branches (sky hooks). The urban environment may provide suitable sky hooks. However, the strong holding force of ground pegs around the tent perimeter and for guy-outs is an unavoidable necessity for shape stability and wind survival. The urban environment, as you point out, may not provide the opportunity to use such pegs. Consequently, a tent with an internal frame would be more suitable. Even so, any tent without ground pegging is likely to blow away. Body weight probably would hold the tent down but it would not be stable. Such stability is essential, in my experience, for good water shedding. Pack weight would be less well distributed and make the tent even less stable.
Overall, I consider that a sleeping swag with a very low wind profile and possibly a small raised area for the occupants head and pack may be more suitable. While not planning on becoming homeless, I have been contemplating such a sleeping system for adventure/fishing trips where the inflated down sleeping mat/down quilt/bivvy bag with a weather proof netted head space are integrated to form primitive but warm and comfortable one-piece sleeping shelter that keeps me away from creepy-crawlies and insects. Something similar may meet your requirements better in the urban environment?
In this regard, I only have the draft of a post titled: Experimental DIY vapour barrier quilt bivvy or a quivvy. However, I have given it some thought and consider that to be most effective, much of the bivvy surface should be highly permeable to body moisture so that condensation of that moisture does not wet the insulation material. For similar reasons the inner surface of the quilt could be a vapour barrier material that restricts the movement of body moisture into the insulation material within the quilt. Consequently, I would like to experiment with a vapour permeable polyester fabric outside of the bivvy where it also serves as the outer of the down filled quilt without any sewn though baffles. In this regard and against popular beliefs, I have found that un-proofed polyester (umbrella fabric) makes very waterproof tents, without the problems of tent condensation associated with ‘formally water proof’ fabrics such as silnylon. “It is similar to old-fashioned tent canvas in this regard.
If you pursue the design with an internal skeleton then it would be good to consider the wet/cold stretch characteristics of your tent fabric. Nylon is particularly prone to such stretching and polyester is virtually immune from it and has the condensation resistance also. “It would be very uncomfortable for a homeless person to be inside a waterproof tent on a cold, rainy and windy night and be constantly showered with a fine mist of their own transpired body moisture that will be shaken of the inside of the tent. I don’t want to be a wet blanket, but fibric choice is critical to good design.”
Even though your design concept excludes the use of pegs I think the inclusion of peg-out and guy-out tabs would be useful. Such tabs can be simple, cheap, plentiful, robust and strong if they are incorporated into the very strong sewn seams of the tent. “On long through hikes pegs have been lost or the ground at trail-head was too hard but we still managed to pitch the tent using small sticks. A single hardened metal peg could be used to make pilot holes for the sticks. Also cord and rocks could be used as anchors when camping on solid rock. So, considering adding tabs to your tent any way. I will even be adding them to my bivvy/quivvey shelter as it too could blow away.”
Pyramid tents do keep their stability when the door is open, but considerable entry of rain and snow and ice is a problem when the door is opened. This is the reason why I added the vestibule to my pyramid to provide a more comfortable entry that does not expose the iside of the tent to precipitation in all its forms and provides a wet person entry/changing area just inside the door.
Regarding seam sewing, I suggest that you consider that when you come up with your design, but I find that flat felled seam is very strong and water resistant and provides those strong attachment points for the peg-out and tie-out tabs.
I hope I have given you some fresh ideas and would be happy to answer further questions. Good luck with your design and I will be interested in the design that you come up with.
Tim